The contents on this site are being moved to Highlander Nexus
Difference between revisions of "Installing an OpenAFS Client on Ubuntu"

(Created page with "This documentation will help in setting up an Ubuntu machine as an AFS client. Means the Ubuntu machine will be able to access the NJIT's AFS directory (/afs/cad/). ; Install...") |
m (Linuxwiki dept.admin moved page Installing an AFS Client on Ubuntu to Installing an OpenAFS Client on Ubuntu) |
||
| (11 intermediate revisions by the same user not shown) | |||
| Line 1: | Line 1: | ||
| − | This documentation will | + | This documentation will show you how to access the NJIT's AFS file system (/afs/cad.njit.edu/) from your Ubuntu machine ('''Ubuntu 18.x LTS'''). You will have to do some installations on your Ubuntu machine to get access to AFS directories. Follow the instructions provided in the rest of the document. |
| − | ; Installing OpenAFS packages | + | ; 1. Installing OpenAFS packages |
---- | ---- | ||
| − | |||
| − | + | * Open the '''Terminal''' application on your machine and run the following command to install the AFS client and Kerberos packages. | |
| − | * | + | |
| − | + | ||
| − | + | sudo apt-get install openafs-krb5 openafs-client | |
| − | + | ||
| − | sudo apt-get install krb5- | + | |
| − | + | [[File:Ubuntu AFS 1.png | 800px]] | |
| − | + | ||
| − | + | ||
| − | + | ||
| − | ; | + | * Now, you will be prompted to provide the AFS Cell Name and AFS Cache. |
| + | |||
| + | [[File:Ubuntu AFS 2.png | 800px]] | ||
| + | |||
| + | [[File:Ubuntu AFS 3.png | 800px]] | ||
| + | |||
| + | * Provide the following information in the dialog boxes and hit '''ok''': | ||
| + | ** AFS Cell: cad.njit.edu | ||
| + | ** AFS Cache: Leave this default | ||
| + | |||
| + | * Once the command has been completed, you will see the message '''DKMS: install completed''' | ||
| + | |||
| + | [[File:Ubuntu AFS 4.png | 800px]] | ||
| + | |||
| + | |||
| + | ; 2. Installing Kerberos Client package | ||
---- | ---- | ||
| − | |||
| − | + | * After installing the OpenAFS packages, you will have to install the Kerberos Client package. Run the following command in a '''Terminal'''. | |
| − | + | ||
| − | + | sudo apt-get install krb5-user | |
| − | + | ||
| − | ; Edit /etc/ | + | [[File:Ubuntu AFS 5.png | 800px]] |
| + | |||
| + | * Now, you will be prompted to provide the Kerberos Realm, Servers and Admin Server. | ||
| + | |||
| + | [[File:Ubuntu AFS 6.png | 800px]] | ||
| + | |||
| + | [[File:Ubuntu AFS 7.png | 800px]] | ||
| + | |||
| + | [[File:Ubuntu AFS 8.png | 800px]] | ||
| + | |||
| + | * Provide the following information in the dialog boxes and hit '''ok''': | ||
| + | ** Realm: NJIT.EDU (In capital letters) | ||
| + | ** Servers: kay00.njit.edu:88 kay01.njit.edu:88 kay02.njit.edu:88 | ||
| + | ** Admin Server: kay00.njit.edu:749 | ||
| + | |||
| + | ; 3. Downloading and Installing the configuration files. | ||
| + | |||
| + | Run the following, it will download and place the krb5.conf and CellServDB files onto your machine. | ||
| + | |||
| + | curl -s https://web.njit.edu/info/kerberos.servers/install_support_files | /bin/bash | ||
| + | |||
| + | |||
| + | ; 4. Edit /etc/krb5.conf | ||
---- | ---- | ||
| − | |||
| − | + | Change the '''ticket_lifetime''' parameter value to '''24h''' under [libdefaults] and [appdefaults] | |
| − | + | ||
| − | + | ||
| − | + | ||
| − | + | ||
| + | [libdefaults] | ||
| + | ticket_lifetime = 24h | ||
| + | |||
| + | [appdefaults] | ||
| + | pam = { | ||
| + | ticket_lifetime = 24h | ||
| + | } | ||
| − | ; Starting the AFS Client and accessing the | + | ; 5. Starting the AFS Client and accessing the AFS home directory |
---- | ---- | ||
* Reboot the machine. The OpenAFS client should auto start upon reboot. | * Reboot the machine. The OpenAFS client should auto start upon reboot. | ||
| − | * | + | * Verify that AFS Client started on boot up. |
| + | |||
| + | df -h /afs | ||
| + | |||
| + | The output of this command should be similar to the following: | ||
| + | |||
| + | [[File:Ubuntu AFS 10.png | 800px]] | ||
| + | |||
| + | ps -ef | grep afsd | ||
| + | |||
| + | The output of this command should be similar to the following: | ||
| + | |||
| + | [[File:Ubuntu AFS 11.png | 800px]] | ||
| + | |||
| + | * Get your Kerberos ticket using kinit, and your AFS token using aklog | ||
| + | |||
| + | kinit ''<Your NJIT UCID>'' && aklog | ||
| + | |||
| + | * Use the following command to check if your AFS token is generated or not. | ||
| + | |||
| + | tokens | ||
| + | |||
| + | The output of this command should be similar to the following: | ||
| + | |||
| + | [[File:Ubuntu AFS 9.png | 800px]] | ||
| + | |||
| + | '''Note:''' Your token will expire in 24 hours. You can renew it by using the following command. | ||
| − | + | kinit ''<Your NJIT UCID>'' && aklog | |
* You should now be able to access your AFS home directory. | * You should now be able to access your AFS home directory. | ||
| − | + | cd /afs/cad/u/<first_letter_of_ucid>/<second_letter_of_ucid>/<your_ucid>/ | |
| + | Example: If your NJIT UCID is abc123 then | ||
| + | cd /afs/cad/u/a/b/abc123/ | ||
Latest revision as of 16:08, 29 August 2022
This documentation will show you how to access the NJIT's AFS file system (/afs/cad.njit.edu/) from your Ubuntu machine (Ubuntu 18.x LTS). You will have to do some installations on your Ubuntu machine to get access to AFS directories. Follow the instructions provided in the rest of the document.
- 1. Installing OpenAFS packages
- Open the Terminal application on your machine and run the following command to install the AFS client and Kerberos packages.
sudo apt-get install openafs-krb5 openafs-client
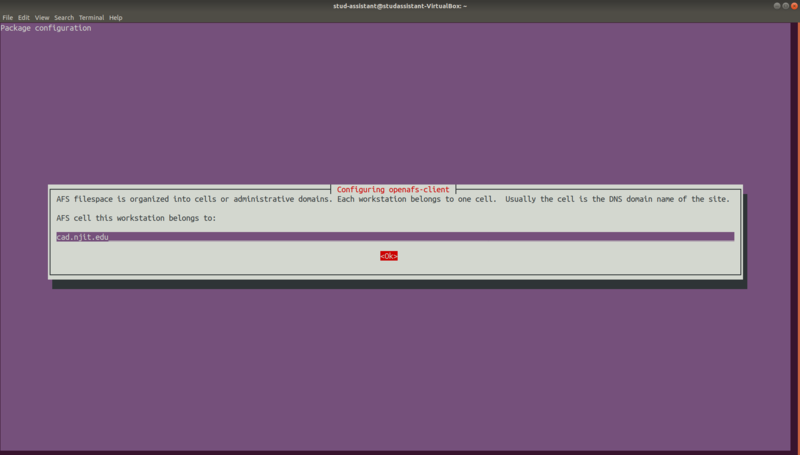
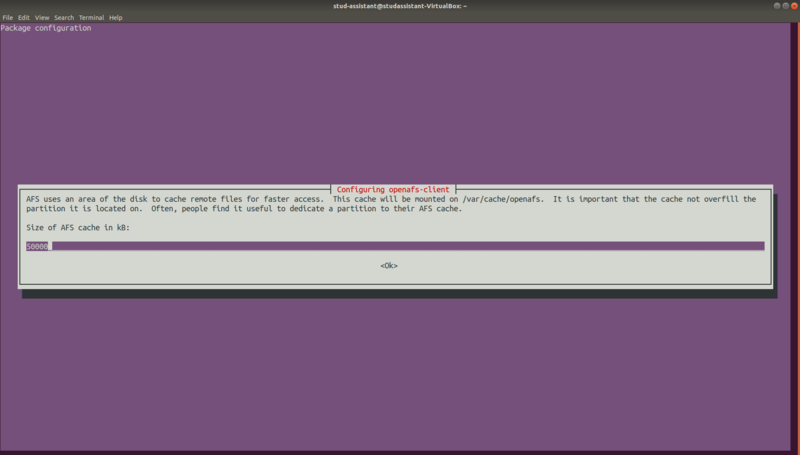
- Now, you will be prompted to provide the AFS Cell Name and AFS Cache.
- Provide the following information in the dialog boxes and hit ok:
- AFS Cell: cad.njit.edu
- AFS Cache: Leave this default
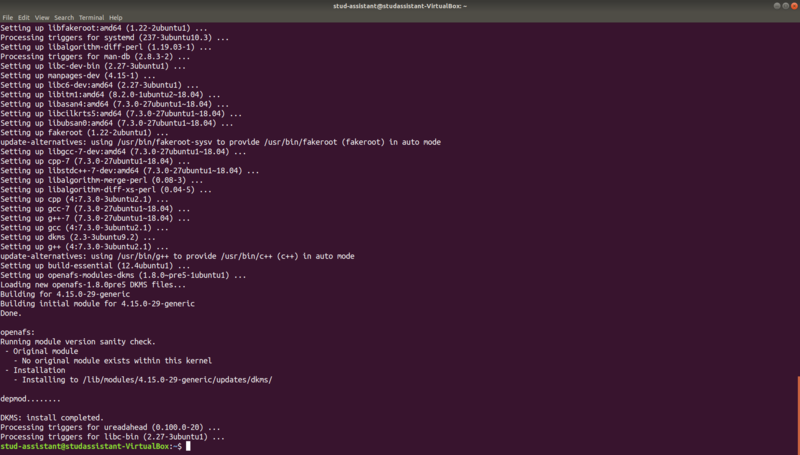
- Once the command has been completed, you will see the message DKMS: install completed
- 2. Installing Kerberos Client package
- After installing the OpenAFS packages, you will have to install the Kerberos Client package. Run the following command in a Terminal.
sudo apt-get install krb5-user
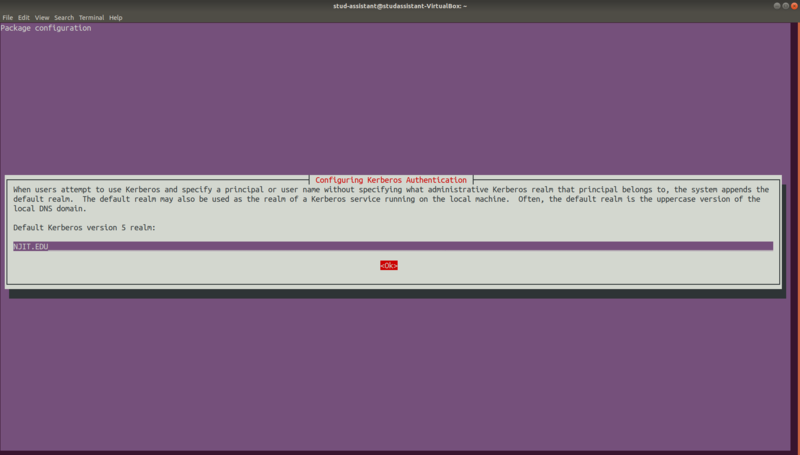
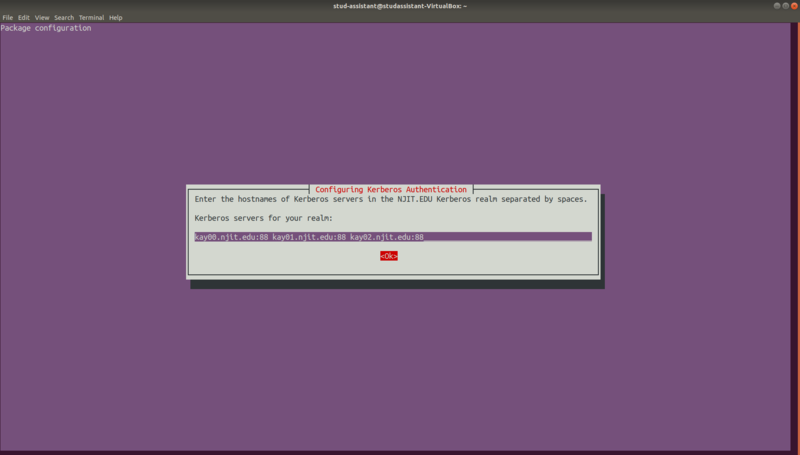
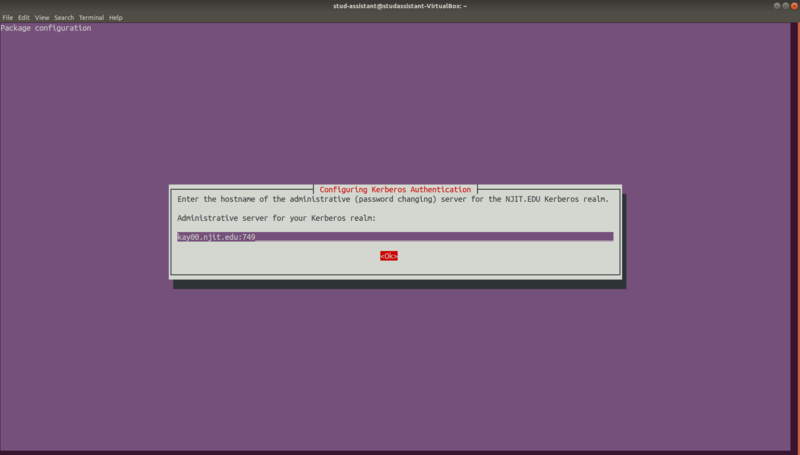
- Now, you will be prompted to provide the Kerberos Realm, Servers and Admin Server.
- Provide the following information in the dialog boxes and hit ok:
- Realm: NJIT.EDU (In capital letters)
- Servers: kay00.njit.edu:88 kay01.njit.edu:88 kay02.njit.edu:88
- Admin Server: kay00.njit.edu:749
- 3. Downloading and Installing the configuration files.
Run the following, it will download and place the krb5.conf and CellServDB files onto your machine.
curl -s https://web.njit.edu/info/kerberos.servers/install_support_files | /bin/bash
- 4. Edit /etc/krb5.conf
Change the ticket_lifetime parameter value to 24h under [libdefaults] and [appdefaults]
[libdefaults]
 ticket_lifetime = 24h

[appdefaults]
 pam = {
  ticket_lifetime = 24h
 }
- 5. Starting the AFS Client and accessing the AFS home directory
- Reboot the machine. The OpenAFS client should auto start upon reboot.
- Verify that AFS Client started on boot up.
df -h /afs
The output of this command should be similar to the following:
ps -ef | grep afsd
The output of this command should be similar to the following:
- Get your Kerberos ticket using kinit, and your AFS token using aklog
kinit <Your NJIT UCID> && aklog
- Use the following command to check if your AFS token is generated or not.
tokens
The output of this command should be similar to the following:
Note: Your token will expire in 24 hours. You can renew it by using the following command.
kinit <Your NJIT UCID> && aklog
- You should now be able to access your AFS home directory.
cd /afs/cad/u/<first_letter_of_ucid>/<second_letter_of_ucid>/<your_ucid>/
Example: If your NJIT UCID is abc123 then
cd /afs/cad/u/a/b/abc123/

